How to make your own sample library
If there is only one thing that I could share with you to help you along your musical journey, it would be to keep every sound you have ever made and kept it in a well-organized sample library. Here are my power tips on How to make your own sample library.
- Practice Sound design
- Save Your Presets
- Group Effects
- Save MIDI Clips
- Organization
For years and years, I never saved any of my presets that I created for my music. Every time I needed a sound, I would open up an old project and copy the instruments or effects across. This process was so stupid and time-consuming. I wish I could go back in time and slap myself across the face.
I don’t want you to make the same mistake. It is so easy to create an organized sample library as you go. You just need to know-how.
Benefits of having an organized sample library:
- You only need to make a sound one time
- You can also attach MIDI clips to your sounds
- Every sound you have ever created is accessible in seconds
- Effect chains can also be saved
- Workflow is so much faster
- You can even sell presets and MIDI clips
If you want these benefits to be a part of your musical experience, then read on.
1. Practice Sound design
The first tip is super obvious. You just want to get better at sound design in general. Watch YouTube tutorials, read blogs, read your favorite synth manual, but most importantly, practice.
Practice, Practice, Practice is key.
It took me quite a long time to finally develop a decent understanding of sounds design. It can be quite confusing in the beginning, but when it clicks, it’s relatively simple.
I recommend only using one software synthesizer. Serum, Massive, Synplant, take your pick. They are many more great synths out there and a lot are free. The benefits of picking one synth and sticking with it, is you get to learn the ins and outs of that synth like the back of your hand.
Tips:
- Try and pick one genre to produce
- Pick a synth and learn it like the back of your hand
- Watch YouTube videos
- Understand Filters, ADSR, LFO
- Adding effects is still sound design
- Have dedicated sound design sessions
2. Save Your Presets
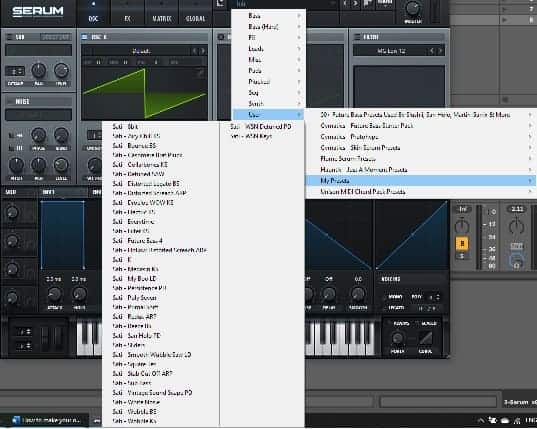
Now that you have picked your favorite synth and are putting in the hours learning how it works, get into the habit of saving your presets into a ‘User’ Directory. This way you can access that preset whenever you chose.
Even if you think the sound is not worth saving, STILL SAVE IT!
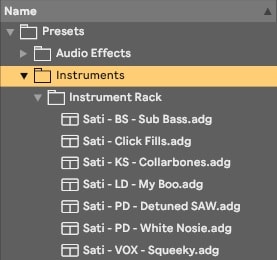
I recently started saving EVERY preset I make, and surprisingly use those sounds just as much as the better ones. When I save them, I have a name that easily explains what the preset is. for Example, ‘BS’ is for Bass, ‘KS’ is Keys, ‘LD’ is for leads, ‘PL’ is for plucks, and ‘PD’ is for pads. If you get the naming process down now it will make life easier in the future.
Tips:
- Save EVERYTHING!
- Name your presets ‘KS – Detuned Super Saw’ or ‘BS – Reece’
3. Group Effects
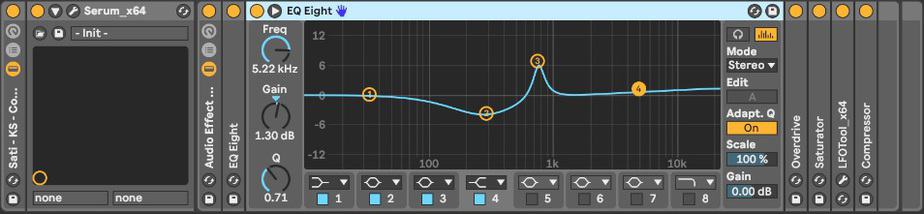
You know when you have about 10 effects in your effects chain and think to yourself ‘How am I going to remember what effects are on here?’ Well, there is an easy way to do so, and that is to group your Synth to your Effects.
This allows you to save the entire effect chain into your DAW for easy access later. I personally use Ableton, but most DAWs have this option.
This was the biggest game-changer for me. It was when my workflow increased so much and I started to develop my unique sound. Think about it. All the sounds you have ever created are available in seconds, and because YOU have created them, they sound like YOU.
When saving your effect chains, add your artist name to look like this: ‘Name – KS – Detuned Super Saw’. This allows you to search your DAW for ‘Name KS’ and BOOM! There are all your keys. Over the years you will have a large personalized sample library that reeks of your style.
Tips:
- Add your artist name when saving
- You can even sell your saved presets
4. Save MIDI Clips
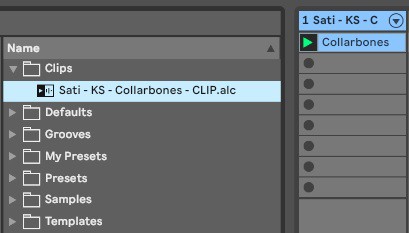
This tip takes things to a whole new level. There are two ways to do this. The generic way, and then the BOSS way. Let’s start in a generic way.
Generic way: Simply come up with your desired MIDI loop and save it as a MIDI clip in an external ‘User’ folder. This is great because you can, once again, Sell these MIDI clips or share them with your friends.
BOSS way: I am not sure if all DAWS are capable of this, but because Ableton is awesome, it allows you to save MIDI clips alongside your preset and effect groups! Meaning when you load your preset, it had the MIDI clip alongside it. Another benefit of this is the ability to preview the clip the same way samples are previewed.
To do this on Ableton, you need to be in session view, have your synth preset and MIDI clip loaded onto a MIDI track. Then click ‘User Library’ and click and drag your MIDI clip into the ‘Clips’ folder. Rename to taste and your good to go.
Tips:
- Rename clips the same as your effect groups but with ‘CLIP’ included
- Single clicking the clip previews it
- Can share or sell saved MIDI clips
5. Organization
Last, but not least, we have organization. The organization is key. What’s the point of saving these presets if you can’t easily access them? The last thing you want is to be frustrated you can’t find the sound you are looking for.
The naming system I demonstrated in this article is just the way I personally do it. I’m sure there are much better ways, but this one works for me. Copy my idea, create your own, It’s up to you.
There are also ways to organize your other samples such as drum, loops, risers, etc. Ableton Live 10 has a new feature that allows you to tag your favorite samples into easily accessible folders. This is another great way to stay organized.
If you are not using Ableton then you can save all samples into an external sample folder that is categorized. Spend some time setting up an easy to navigate folder system. It is easy to set up now but hard to change later.
Summary
Music production is about workflow. Anything that allows your workflow to improve is positive, and I guarantee you that these techniques will dramatically increase your workflow. You must keep on top of things as you go, and in the long run, it pays off.
Everything in this article is just me explaining how I do things. The beauty of music production is the ability to do things the way you chose. I hope this has shed some light and answered some of your questions.
Happy Producing.