How to sidechain in Ableton
Sidechain. Probably one of the biggest tricks that will dramatically improve your electronic music production. Don’t be scared. It might seem daunting at first but that’s why I have created this article. It will include pictures and audio samples to help you understand the process.
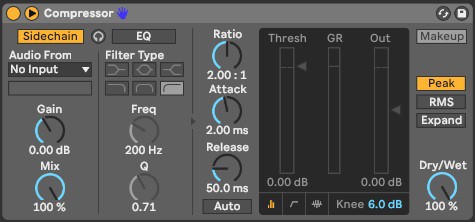
The easiest and fastest way to sidechain is using Ableton’s default compressor audio effect. Drag this onto the track you want to sidechain, then click the down arrow in the top left corner, followed by clicking the ‘Sidechain’ button. Then simply click the ‘Audio From’ Dropdown box and select the desired incoming signal. Then simply lower the threshold until you reach your desired gain reduction.
What is sidechain compression?
Sidechain compression is quite simple. Basically, one signal is used to control the volume of another signal. For example. A kick drum can be used to reduce the volume of a bass instrument right as the kick hits. There are many reasons you would use sidechain compression as we will talk about later.
Now we know exactly what it is, let us dive right in and learn how to sidechain Ableton.
1. Choose a track you want to sidechain
I am going to be using an example in this article to help you easily follow along. I will be using a kick drum, to sidechain a synthesizer. In other words, the kick drum will lower the volume of the synthesizer when the kick drum hits, then the volume of the synth will return to its original volume.
Here is the synth I am going to sidechain:
We will sidechain it to this kick:
And then we will fine-tune it to sound like this:
Now let’s drag a compressor onto our synth track and click the little down arrow in the top left corner followed by the sidechain button. We have just told our compressor to stop doing its normal duties and to focus only on sidechain compression.
2. Choose an input signal
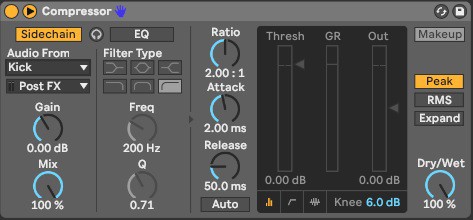
It’s now time to select our kick from the ‘Audio from’ dropdown menu. I have called mine ‘Kick’ so it’s easy for me to find.
You will notice that even with the sidechain button clicked there is no change the synth signal. This is because we have not yet told the compressor how much we want the volume to decrease when the kick hits.
Let’s pull the ‘Thresh’ fader all the way to the bottom and see what happens.
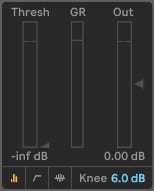
This is what it sounds like now:
You will notice we now have a ducking noise on the synth track whenever the kick hits, but it doesn’t sound very clean. We just need to fine-tune the compressor settings to achieve the sidechain effect we desire.
3. Understanding Ableton’s compressor
Once you understand how Ableton’s compressor works and what each dial and fader do, we can customize the sidechain to fit perfectly into our song. Let’s take a deeper look into all the compressor settings and see how they affect our synth track.
Threshold
The threshold is the dB level that the incoming signal needs to reach before gain reduction happens. If we set the threshold to -10dB, and the kick is only -20dB, then nothing will happen because the kick signal is -10dB below the threshold.
But if we set the threshold to -40dB and the kick is -20dB we get 20dB of gain reduction.
Let’s look at it this way.
- Set your threshold to 0dB by double-clicking the threshold setting.
- Play your track on loop and listen carefully to your sound.
- Slowly lower the threshold and listen to what happens. The ducking sound gets more and more prominent until all sound is completely gone when the kick hits.
This is because you are lowering the level at which the compressor begins to work. A threshold setting of ‘Inf’ means no signal gets through, -50dB means anything under -50dB can get through, -30dB means anything under -30dB can get through, and so on.
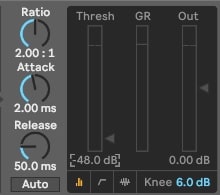
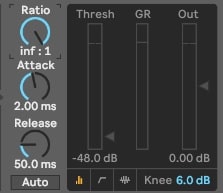
For this example, lets set our threshold fader to -48dB so we have a little bit of signal coming through when the sidechain is in effect.
The ratio changes this a little so we will talk about that next.
Ratio
The ratio can complicate things a little bit more, but I will try and make it as clear as I can. With the Ratio set to ‘Inf’, it’s telling the compressor to reduce the ALL of the signal that goes past the threshold setting. It acts like a limiter not allowing anything past.
When you change the ratio settings it is telling the compressor to allow a certain amount of signal through.
For example. If we set the ratio to 5:1 this means that for every 5dB of gain reduction the compressor is only allowing 1db to pass. Or 2:1 means for every 2dB of gain reduction only 1dB can pass. The higher the ratio, the more gain reduction.
We can use the ratio to fine-tune our compression for our track’s specific needs.
For this example, we are creating a heavy dance track lets set our Ratio all the way to ‘inf’ so we get full gain reduction.
Tip: Most electronic music has a very high ratio. Listen to your favorite songs and figure out what settings they have on their compressor, then implement those settings into your own music.
Attack
That most of the difficult to understand stuff out of the way. The rest is easier from here on. The attack is quite simple.
All the attack setting does is tell the compressor how long it should take for the signal to reach its threshold level.
For example. When the compressor first detects the kick drum, attack determines how long it takes to reach the threshold level. Easy as that.
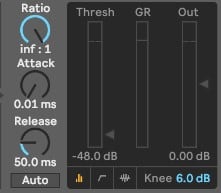
If you want the sidechain to happen as soon as the kick hits, then have an attack of ‘0.01ms’. Or if you want the sidechain to slowly activate then increase that time.
I want the sidechain to happen immediately so I will set the attack to ‘0.01ms’.
Tip: If your kick sample is only .5 of a second long, but you have your attack set to 1s, your compressor won’t reach its full gain reduction. Make sure your attack is set to a small number, so it reaches full gain reduction quickly enough.
Release
The release is pretty much the same as the attack. It determines how long it takes for the compressor to stop working after the input had finished.
In other words, once your kick has completely finished playing, how long it takes for your synth signal to reach its normal volume again.
I want my track to have a nice pumping feel to it so I will give it a small about of release. About ’80ms’
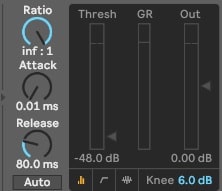
Tip: If you have a long release, the signal won’t have time to reach its original volume level before the next kick comes. Spend some time trying to find that sweet spot.
Dry/Wet
A dry signal is a signal with no effects or processing and a wet signal is the opposite, with effects or processing. Dry/Wet on the compressor is the mix of each signal.
If the Dry/Wet is set to 50% then you will hear 50% dry and 50% wet. If its set to 0% you won’t hear any effect of the compressor at all because the signal is completely dry. If you set the dry wet to 100% then you will hear everything the compressor is doing.
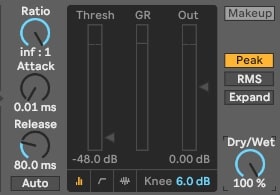
For this example, I will set the Dry/Wet to 100%.
You will see the Dry/Wet knob scattered all over Ableton’s effects. It does the same thing for each effect.
Tip: Push your Dry/Wet to 100% wet and then change your compressor settings. This allows you to hear exactly what the compressor is doing. Once you are happy, dial back the Dry/Wet until your happy with the mix.
Peak, RMS, Expand
Peak. This tells us the loudest part of the kick drum or input signal. The peak of its volume.
RMS. RMS is an average of the kick drum or input signal. If this is selected the compression will be based on the average gain of the kick, rather than the peak.
Expand. When this is activated it reverses the function of the compressor. Meaning rather than getting gain reduction, we will get increased gain.
When sidechaining we generally use the ‘Peak’ setting so we detect the loudest part of the incoming signal.
RMS is used more when you are using the compressor for normal compression techniques.
Knee
The knee is called a knee because it visually looks like one. It refers to how smoothly the signal is compressed once reaching the threshold.
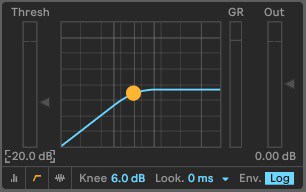
If the knee is set to 0dB then the sidechain will be harsher. This is called ‘Hard Knee’. The higher dB you set the knee the softer the sidechain will be. This is called ‘Soft Knee’.
You might see ‘Soft Knee’ and ‘Hard Knee’ in many other Ableton effects. They will all relate to the same method.
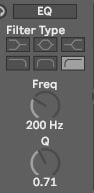
EQ
Ableton’s compressor has a built-in EQ for the incoming signal. This means we can choose what frequencies of the kick we want to activate the compressor.
Maybe we want just the click at the beginning of the kick to affect our compression and not the thumpy bass at the end.
To achieve this simply click the EQ button followed by the low-cut button. Then raise the frequency until you reach your desired result. It’s best to do this while listening to your sidechain.
Or maybe we want the thump and not the click. Click the low pass and adjust the frequency to suit.
Experiment with these settings as they will all achieve different results.
Tip: Adjust your frequency knob while your song is playing back.
4. Where to properly use sidechain
Sidechain can be used in many different ways, but generally, sidechaining is a mixing technique. It’s used to make room for specific layers of your track.
A kick and bass combination should always be sidechained to prevent muddiness and clutter in the low frequencies.
If you can hear clashing frequencies with other percussive instruments, experiment with sidechaining them.
Of course, there are many other ways to mix your songs like EQ and panning, but sidechain should be considered just as important.
5. Other ways to sidechain Ableton
The compressor tool is not the only way to sidechain in Ableton. Now we know that sidechaining is basically a decrease in volume at the desired time, we can do it manually with other effects such as ‘Utility’ or even the track volume.
This can be done by drawing in automation to replicate the sidechain effect. Simply drag an instance of ‘Utility’ onto your track, open the automation lanes, and pencil in your desired sidechain shape.
It should look something like this.

This method takes longer as you must manually automate every beat.
There are third party plugins that can also be used as sidechaining such as LFO tool or Nicky Romero kickstart.
6. Creative ways to sidechain Ableton
As we mentioned, the most common reason for sidechaining is to stop clashing frequencies. But we can also get creative when sidechaining.
- Try going over all the steps we have covered in this article, and then mute your kick track. You will hear the pumping but without the kick playing in the silence.
- A lot of the time producers will create a track just for sidechaining. They will place the kicks exactly where they want them and then mute the channel. Then in the ‘Input from’ dropdown box in the compressor, they select their sidechain track. Now all sidechaining comes from that dedicated track. This allows you to change kick samples or move them around without upsetting the sidechain settings.
- Another method is to sidechain your instruments to your vocals. This can create extra space for your vocals to breathe. Or maybe you are recording a narration over a backing track. Try sidechaining your backing track to your voice over.
- Sidechain your snares to make them feel nice and punchy.
- Sidechain reverb tails.
- Try sidechaining your master and see what interesting results you can come up with.
Summary
Sidechaining can take your production to new heights. It’s a great technique to learn but its one that takes a while to master. Spend some time learning what each part of the compressor does. See how it affects the sound.
I’m not saying that you should do everything the way I have explained. These techniques are the way I do things and they work for my production style. It’s a good idea to learn from as many people as possible.
I hope this has helped shed some light on the manner on how to sidechain Ableton.
Goodluck.